Even though you might not wear one very often these days, ties are nevertheless needed for particular occasions. Sad to say, but some grown guys are incapable of tying a tie. They will go shopping for a clip-on if they have an important interview that afternoon. Even if a man can tie a tie, he usually only knows how to tie one specific necktie knot.
However, there are numerous tie-tying techniques. To achieve the greatest results for your appearance, specific necktie knots should be utilized with specific shirt collars and tie fabric choices. The three traditional necktie knots a man should know are seen below, along with information on when to use each one.
Both individual tie knot videos and a single, lengthy video featuring all of them have been produced by me. I’ve inverted the pictures so you can more easily follow the directions. My right is therefore the same as your right and my left is the same as your left when you are watching the movie. These movies date back to 2009. I’ve retained them because they’re still in good shape. You get to see how I looked without a mustache and with a fresh face.
How To Tie A Tie Knot – Tying 18 Different Necktie Knots
You will learn 18 different tie knots in this article.
The tie knot.
Why?
It conveys a subconscious message about the importance of detail.
Don’t believe me?
Take a look at almost every President. comprehensive Windsor knot.
Look at casual business attire.
the half Windsor knot or four-in-hand knot.
Each look conveys a different message and is appropriate for a certain shirt collar and neck. For tall, short, huge, and slender guys, there are several tie knots.
But the majority of men use the same tie knot their entire lives.
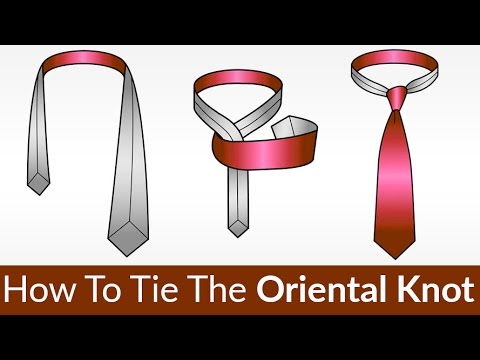
Starting with the simplest and quickest tie knot, the Simple or Oriental Knot, I’m going to walk you through 18 different methods to tie a necktie.
Learn how to tie a tie step by step:
The Simple and oriented Knot Tying Instructions:

Learn how to tie a tie:
- Wrap the tie around your collar two or three inches below where you want it to terminate, with the thick end on your left and the seam facing inward.
- Bring the thick end across the thin end’s front in a horizontal motion, then pass it back behind the narrow end in a similar motion.
- Once more, from left to right, pass the thick end across the front of the knot.
- Pass the thick end behind the knot once more, this time horizontally from right to left.
- Once more, cross the thick end from left to right across the front of the knot. This third horizontal loop can be accessed with a finger.
- The thick end’s tip should be fed through the third horizontal loop after being brought up below the loop that wraps around your collar, up behind the knot, and down over the front of the knot.
- Snugly insert the thick end inside the horizontal loop.
- Holding the knot in one hand while gently pushing on the narrow end with the other will allow you to adjust the tie.
Click here to watch the YouTube video – The EASIEST Knot To Tie
Now you know how to tie a necktie the easiest way… are you ready?
these 17 tie knots to find out if it’s right for you and get step-by-step instructions.
- Four In Hand Knot
- Half Windsor Knot
- Full Windsor Knot
- Nicky Knot
- Bow Tie Knot
- Kelvin Knot
- Pratt Knot
- St Andrew Knot
- Balthus Knot
- Hanover Knot
- Plattsburgh Knot
- Grantchester Knot
- Victoria Knot
- Cafe Knot
- Eldredge Knot
- Trinity Knot
- Christensen Knot
1. Four In Hand Knot

Learn how to tie a Four In Hand Knot:
- You should knot your collar in a loop. 3–4 inches below than the thin end is the thick end on the left.
- Before the thin end, cross the thick end.
- Cross the thick end horizontally from right to left after wrapping it around the narrow end.
- Bring the thick end over the front of the knot horizontally, going from right to left. Put a finger underneath this band here.
- Turn the thick end’s tip upward and inward, then slide it under the loop that is around your neck.
- Through the loop you’ve held open with your finger, feed the thick end down.
- To tighten the knot, pull the thick end all the way through the loop.
- Holding the knot firmly in one hand while gently pulling on the narrow end with the other, tighten it.
One of the most common necktie knots for newcomers learning how to tie a tie is the four in hand knot. In addition to being simple to learn, it’s also one among the oldest; British riders are supposed to have devised it in order to tie scarves while holding the reins of four horses in the other hand.
This knot is ideal for tall guys trying to tie a conventional length tie because it uses less of the tie’s length.
Dress shirts with button-down collars and thin spread collars look great with the narrower shape.
2. Half Windsor Knot

Learn how to tie a Half Windsor Knot:
- Wrap the necktie over your collar, placing the thin end on the left at approximately your ribcage and the wide end on your right dangling down to your thigh.
- Below your chin, create an X by crossing the broad end in front of the thin end from right to left.
- Wrap the tie’s broad end around the narrow end and behind it in a horizontal loop.
- Pull firmly as you pass the wide end through the X’s opening from the top.
- With your right hand still holding the wide end, cross it in front over the thin end from right to left.
- Bring the wide end of the triangle toward your chest from behind while maintaining its integrity with your left hand.loop, pass it over the X.
- Open up the triangle that has now formed over the X using your left hand’s index finger, and pull the wide end all the way through.
- Pull the thin end of the tie down while drawing the knot up toward your collar to change the length.To make sure the horizontal loop is smooth and even, it might need to be adjusted.
The Half Windsor knot is best suited for guys just starting to learn how to tie a tie, along with the Four-In-Hand knot.
For ties that are thick and of medium breadth, this knot is ideal. It is the most functional and well-liked tie knot.
The half Windsor knot is a wonderful option for big and tall guys wanting to wear a conventional length tie because it uses less of the tie’s length than the larger Windsor knot.
3. Full Windsor Knot

Learn how to tie a Full Windsor Knot or Double Windsor Knot:
- The wide end of the necktie should be on the right and should hang 4-6 inches below your waistband as you wrap it over your collar.
- Make an X with the broad end, crossing it horizontally in front of the slim end, just below your chin.
- Bring the broad end out behind the X and tuck it up and behind the loop around your neck. To secure the X, use one finger.
- Completely lower the wide end.
- Pass the wide end horizontally from right to left after wrapping it around the knot.
- Turn the wide end tip upward and pull it across the front of the knot diagonally.
- Bring the broad end back down after looping it over the top of the loop around your collar. On the left of the skinny end is where it ought to appear.
- From left to right, bring the wide end over the front of the knot.
- A band of this kind is horizontal. Put a finger through it to secure it.
- One more time, pass the wide end underneath the loop and around the collar with the tip pointing up.
- The tip should be slid through the horizontal loop you saved with your finger in step 8 as you turn the wide end downward.
- Smooth up any creases or slack in the knot by fully retracting the wide end.
The Full Windsor Knot is the method that is always stated when I’m asked how to knot a tie. The Full Windsor, also referred to as the Double Windsor, is ideal for broad spread collars and large necks on males. It has a large, triangular symmetric design.
Because of the two wrappings, a longer tie is needed for the Windsor knot. Tall guys with larger necks will want a tie that is between 61 and 64 inches in length.
4. Nicky Knot

Learn how to tie a Nicky Knot:
- The necktie should be wrapped around your collar about two inches lower than where you want it to be when it is finished, with the seam facing out and the thick end on your left.
- Make an X-shape behind your chin by crossing the thick end underneath the thin end.
- To the left of the thin end, the thick end should emerge after being flipped up in front of the loop that surrounds your collar.
- Bring the thick end’s tip across the front of the knot in a horizontal motion.
Put a finger in the gap you just made in the horizontal band spanning the front of the knot. - Bring the thick end’s tip up and into the loop that is around your collar.
- Put the thick end’s tip through the horizontal loop you made in Step 4 and tuck it down.
- Completely insert the thick end into the horizontal loop, then tighten it.
- Holding the knot in one hand and pushing on the tie’s thin end with the other, you can adjust it as necessary.
5. Bow Tie Knot

Learn How To Tie A Bow Tie Knot:
- Beginning with the seams facing down and the right side longer than the left, drape the bow tie over your neck.
- Make an X-shape slightly below the chin by crossing the right end over the left end.
- To tie a basic knot like the first knot while tying shoelaces, loop the longer end under the “X.” Keep a firm grip while letting the longer end rest on your shoulder.
- Fold your index finger into a bow shape by putting it on the broadest section of the shorter end’s curve. With the shorter end as close to your neck as possible, place the folded tip across your collar.
- Bring the longer end straight down over the shorter end in the middle of the bow while holding it in place with your left hand’s forefinger and thumb.
- Fold the longer end back towards your chest with your right hand, crimp the fold, and double the tip over to form a wing.
- Put the folded tip of the longer end through the tiny loop you made when you first passed it up behind the knot, then tuck it behind the folded tip of the shorter end.
- Pull the loops behind the wings to tighten the front vertical knot after they are in position.
- Holding the knot’s front firmly in place with one finger, adjust the wings’ symmetry.
- Finalize your adjustments. Verify that your bow tie rests horizontally and flat against your collarbone. You’re finished! You now understand how to tie both a bow tie and a tie.
6. Kelvin Knot

Learn how to tie a Kelvin Knot:
- With the thick end on your left and the seam facing outward, drape the necktie around your collar so that it hangs two to three inches below where you want it to terminate.
- Make an X under your chin by crossing the thick end under the thin end from left to right.
- From right to left, bring the thick end back across the front of the knot. Pass it back from left to right behind the knot as you continue to wrap it around the narrow end.
- The thick end should then be brought back across the front of the knot from right to left. To make a horizontal band, slide a finger underneath.
- Put the thick end under the collar loop and tuck it upward.
- Bring the thick end’s tip through the horizontal loop you made in Step 4 to the bottom (but not the smaller one you created in Step 3).
- Snugly tie the knot by slipping the thick end completely through the horizontal loop.
- Grab the knot with one hand and gently pull on the thin end with the other to tighten the tie.
7. Pratt Knot

Learn how to tie a Pratt Knot:
- With the seam facing outward and the thick end dangling on your left, 1-2 inches below the preferred ending point, drape the tie around your collar.
- Form an X with the thick end below the thin end just behind your chin.
- Through the loop, insert the thick end.
- Flip the tip so that it is pointed to your left after fully retracting the thick end.
- Bring the thick end over the front of the knot horizontally (from right to left). Put a finger behind the band you just made that is horizontal.
- The thick end should be inserted from below through the loop.
- Directly above the narrow end, point the thick end’s tip downward.
- Through the horizontal band, pull the thick end downward. Put it in place firmly.
- Grab the knot with one hand and gently tug on the thin end with the other to adjust the necktie.
8. St Andrew Knot

Learn how to tie a St Andrew Knot:
- Two to three inches lower than the final position, wrap the necktie around your collar with the thick end on your left and the seam facing out.
- Making an X with the thick and thin ends, cross them horizontally beneath your chin.
- Bring the thick end over the thin end’s front in a horizontal position.
- Continue to wrap the thick end around the thin end, passing it behind the thin end’s back from left to right while doing so.
- The thick end should be folded vertically up and over the knot’s front before being tucked back behind the knot.
- To the left of the thick end, extend the thick end.
- From left to right, bring the thick end over the front of the knot. A band will result from this. A finger should fit through it.
- Finally, tuck the thick end through the horizontal loop you created in Step 7 and pull it up behind the knot.
- By holding it in place with one hand while carefully pushing on the thick end with the other, you may tighten the knot.
9. Balthus Knot

Learn how to tie a Balthus Knot:
- Wrap a LONG tie around your neck, leaving the thick end on your left and the seam facing up. The narrow end should rest in the middle of the chest, while the thick end should hang at least to mid-thigh.
- Overlap the thin and thick ends.
- Bring the thick end forward, place it behind the thin end, and then cross it over it.
- Returning to the front, loop the thick end over the thin end on the left side of the knot as it is forming.
- Finish with the thick end behind the narrow end and to its right. Tuck it down and across.
- The thick end should be turned upward and looped over the knot’s centre.
- Next, cross the thick end from right to left behind the knot.
- Bring the thick end over the knot’s front horizontally, crossing it from left to right.
- Bring the thick end up and behind the knot. Keep the horizontal pass you just made a touch loose.
- Pass the thick end horizontally through this position.
- While securing the knot with your other hand, adjust by gently pulling down on the thin end. The tie beneath the knot should be relatively wide but still reach your beltline in ideal circumstances.
Make sure you wear the Balthus knot to those luxury events, such as theatre performances and art exhibit openings.
10. Hanover Knot
Learn how to tie a Hanover Knot:
- Wrap the necktie over your collar, leaving the seam exposed and the thick end dangling 4-5 inches below where you want it to terminate.
- Making an X, cross the thick end beneath the narrow end from left to right.
- From right to left, bring the thick end over the front of the narrow end. With one hand, hold onto the knot as it forms.
- Put the thick end through the collar loop and tuck it up.
- Don’t tuck it through the horizontal band you made in Step 4—bring the thick end all the way down and pull it through instead.
- Turn the thick end around and cross it behind the knot from right to left.
- By passing it diagonally in front of the centre, flip the thick end upward.
- Allow the thick end to emerge from behind the knot, hanging to your right, after being fed through the loop.
- Bring the thick end across the room, left to right. A second horizontal band is therefore produced. Insert a finger here under the band.
- Bring the thick end up next, passing it underneath the loop around your collar once more.
- To secure everything, slide the thick end through the horizontal band.
11. Plattsburgh Knot

Learn how to tie a Plattsburgh Knot:
- With the thick end on your left and the seam exposed, drape the necktie around your collar 4-5 inches lower than where you want it to terminate.
- To create an X, cross the tie’s thick end under the small end. The thick end’s tip should be flipped over the front of the loop around your collar while holding on to that X.
- Bring the thick end back toward your left side after tucking it through the loop.
- The thick end should face upward.
- Keeping to the left of the narrow end, bring the thick end back up in front of the loop.
- When you emerge on your right, tuck the thick end down into the loop.
- Bring the thick end over the front of the knot horizontally, going from right to left. Put a finger underneath the band you just made.
- From behind, tuck the thick end up through the collar loop.
- Insert the thick end into the horizontal band and tighten it down.
- Holding the knot and pushing on the thin end with one hand can help you tighten it. Make the edges look symmetrical by adjusting them.
12. Grantchester Knot

Learn how to tie a Grantchester Knot:
- Wrap the necktie around your collar 4-5 inches lower than where you want it to terminate, with the seam facing out and the thick end on your left.
- Form an X by crossing the thick end under the thin end.
- Going horizontally from right to left, cross the thick end over the front of the thin end.
- The thick end is then wrapped behind the thin end from left to right.
- Now cross the front from right to left while wrapping the thick end.
- The horizontal band you just created can be held in place using a finger.
- The thick end of the tie should be tucked under the collar loop.
- Let the thick end hang in front of the knot after flipping it downward. Keep holding the band in place with your finger.
- From right to left, wrap the thick end around the knot.
- Put a finger under the horizontal band you’ve made by wrapping the thick end around the front of the knot from left to right.
- Bring the thick end up through the collar loop from the bottom.
- The thick end should be inserted into the horizontal band, secured, and the corners should be teased out into an even form.
13. Victoria Knot

Learn how to tie a Victoria Knot:
- Wrap the necktie around your collar approximately 2-3 inches below where you want it to terminate, with the thick end on your left and the seam facing inward.
- Horizontally, cross the tie’s thick end in front of the thin end and then behind it.
- Once more cross the thick end from left to right across the front.
- From right to left, pass the thick end behind the knot.
- Thirdly bring the thick end across the front, then tuck a finger under the newly formed horizontal band.
- The thick end should be inserted through the collar’s loop from the bottom up.
- Insert the thick end through the band’s horizontal slit.
- Insert the thick end snugly. With one hand holding the knot and the other gently pulling on the narrow end, you can adjust.
14. Cafe Knot

Learn how to tie a Cafe Knot:
- With the thick end on your right and the seam facing inside, drape the necktie around your collar about a half-inch lower than you would like the finished tie to hang.
- Form an X by crossing the thin end over the thick end. Next, pass the thin end behind the X through the loop you just made.
- Flip the skinny end onto the knot’s top.
- From left to right, bring the thin end behind the knot.
- Then, stretch the front’s thin end from right to left.
- Bring the thin end up through the loop around your neck and behind the knot at this point. This will leave a band across the front of the knot that is horizontal.
- Turn the skinny end so that it drapes down over the front of the knot.
- Bring the thin end just to the left of the thick end, then pass it from left to right behind the knot.
- Pointing the tip upward and in the direction of your left shoulder, bring the narrow end up in front of the knot.
- The thin end should emerge on the left side of the large end after being tucked under the remainder of the knot and through the loop around your collar.
- Pull the thin end down firmly and give the knot’s centre some time to settle. The diagonal legs should rise at the same angle and come together under your chin.
- Flip the thick up and forward. It can be thrown over a shoulder
- When the thin end is pointed upward, pass it through the back of the knot’s lone horizontal loop.
- Squeeze it tightly after fully slipping the narrow end through the loop.
The tie’s two ends should be flipped back down. - Holding the knot in one hand and pulling on the thick end with the other, gradually tighten.
The Cafe Knot is a challenging puzzle. Don’t attempt it until you are thoroughly comfortable with the fundamentals of tie tying.
15. Eldredge Knot

Learn how to tie an Eldredge Knot:
- Place the broad end of the tie on your right exactly where you want it to hang when you’ve tied the knot. Drape the tie across your collar.
- Cross the thin end of the tie in front of the thick end as horizontally as you can, pinching the broad end to create a dimple.
- Cross the thin end horizontally from right to left behind the cross-shape.
- Put the skinny end through the collar-loop loop.
- Bring the thin end across the thick end in a horizontal position.
Tuck the tip of the thin end up through the loop around your collar and flip it over the top of the knot, crossing diagonally downward from left to right. Pull it down snug to form a diagonal band along the right side of the knot. - Bring the thin end up through the diagonal band and around the back of the knot.
- Create a diagonal band on either side by feeding through and pulling tightly.
- Aim the tie’s thin end straight up, then tuck it under the loop that surrounds your collar so that it emerges to the right of the knot.
- Your collar is circled by wrapping the skinny end of the tie up around it. Give yourself some leeway in this step.
- Put the thin end’s tip through the loop you just made and tuck it down and to the left, underneath the loop you’ve made around your neck.
- The thin end should be flipped over the top of the collar loop.
- Put the remaining thin end beneath the large end or slide it horizontally under the loop around your neck to hide it from view. Adjust each diagonal band to roughly the same width and tighten if necessary by pulling the thick end.
This is a very complex tie knot that says you REALLY know how to tie a tie… and you’re not afraid to show it off.
16. Trinity Knot

Learn how to tie a Trinity Knot:
- When you want the tie to be the desired length, drape it around your collar with the thick end hanging on your right and the seam facing inward.
- The X-shaped thin end should be crossed diagonally in front of the thick end before being tucked beneath the loop around your neck.
- Reverse the narrow end over the loop’s top.
- Pass the thin end behind the thick end horizontally.
- The thin end should be flipped over the top of the collar loop.
- On the far right side of the knot, feed the tip of the thin end down and out from underneath the loop around your neck.
- From right to left, bring the narrow end over the front of the knot. To make a horizontal band, slide a finger underneath.
- Bring the narrow end through the horizontal band and up under the loop around your collar. Just above the knot, slide a finger underneath the pointed end.
- From right to left, wrap the thin end behind the thick end.
- Feed the tip of the narrow end up through the small vertical loop you reserved in Step 8 and over the loop around your collar.
- While still angling diagonally upward and to your right, pull the thin end all the way through the vertical loop and snug it down.
- To make the three visible folds identical in size and angle, remove all of the slack from the knot and make any required adjustments. Put the thin end either under the loop around your collar or behind the thick end.
17. Christensen Knot

Learn How To Tie A Tie Christensen Knot:
- Wrap your collar in the necktie, leaving the thick end on the left. This end ought to be dangling four to six inches or more below the desired finishing length.
- From left to right, horizontally cross the thick end in front of the thin end.
- Horizontally, from right to left, bring the thick end around behind the thin end.
- The thick end should be placed in front of the collar-loop loop.
- The thick end should emerge on the right side of the thin end after being tucked beneath the loop around your collar.
- Cross the diagonal you made in Step 5 and the prior horizontal band with the thick end in front. Put a finger under this fresh horizontal intersection.
- From left to right, wrap the thick end around the knot.
- Over the horizontal fold you formed in Step 6, bring the thick end across the front. (The fold should still be held open by your finger.)
- Keep one finger holding each of the horizontal bands just off the collar.
- Put the thick end of the piece under the collar loop.
- Pull through after tucking the thick end under the two horizontal crosses.
- Holding the knot with one hand will help you pull it into position. Now use the other to gently pull on the narrow end. Until the X shape of the knot is clearly visible, use your finger to peel out the diagonal folds.
Now that you know How To Tie A Tie knot, here’s an article on why you need to know how to tie a bow tie.